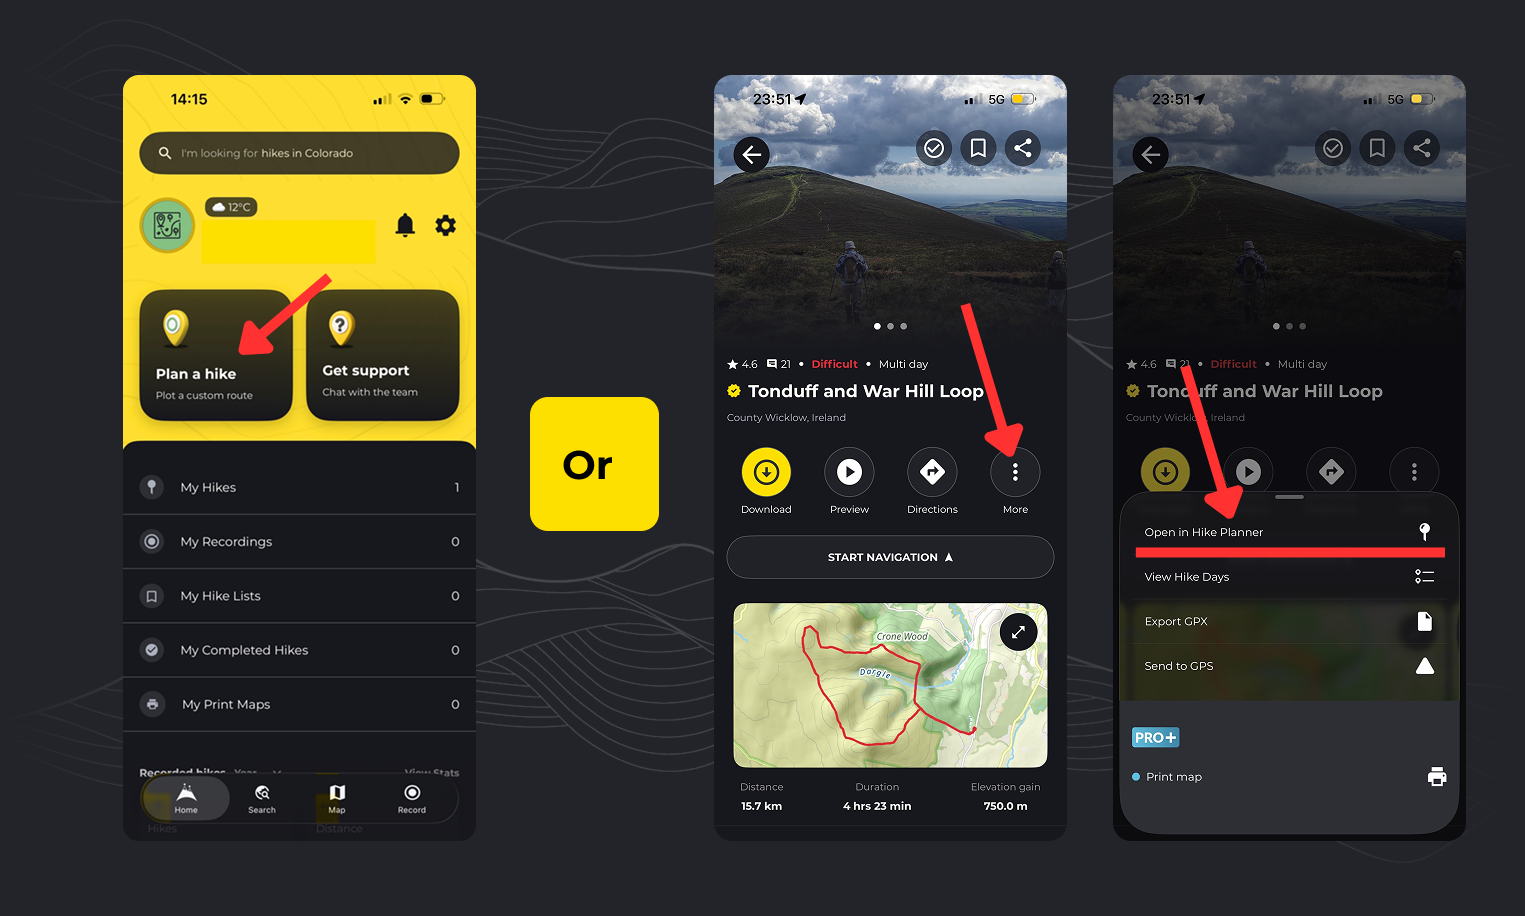
To create a new hike from scratch:
- Open the Home Page.
- Tap Plan a Custom Hike.
To edit an existing hike:
- Open the hike overview page.
- Tap the More (⠇) button.
- Select Open in Hike Planner.
How to plot a new route
Adding Points
- Long tap on the map to add locations where you want to hike.
- As you add points, the app will automatically draw a hiking route between them.
- When you’ve added a start and end point, your estimated distance, elevation gain, and hike time will appear.
- Swipe up on the bottom section to view the full elevation profile.
💡 Top tip: Drag along the elevation profile to see details for any specific location along the hike — including distance, elevation, and expected terrain.
Undo / Redo
You can undo or redo any mistakes by tapping the Undo or Redo buttons.
Editing Control Points
To edit a control point you’ve added, long tap on it, then drag it to a new location.
Deleting Points
Tap a control point and select Delete to remove it.
How to import a hike/trail into HiiKER

You can import an existing hike into the planner to edit or modify as you wish.
- Tap the Hike Days button.
- Select Import Hike.
- Use the text input to search for HiiKER hikes, your own hikes, or your recordings to import as a route.
- To import a GPX file, tap Import GPX in the top-right corner and select the file you wish to use.
How to plan a multi-day hike using HiiKER

The HiiKER Planner is a powerful tool for creating multi-day itineraries.
To add a new route:
- Within the Hike Days section, tap Add Route.
- You’ll return to the map to plot a new route.
- Once done, go back to the Hike Days page — you’ll now see two routes listed under two separate days.
Routes and days are fully draggable, allowing you to reorder and adjust your timeline to create a detailed itinerary for your adventure.
Edit a day name on HiiKER
- Tap on the “hike days” button
- Highlight the day you wish to rename
- Tap the More (⠇) button.
- Select “Rename day”
Delete a day from a hike on HiiKER
- Tap on the “hike days” button
- Highlight the day you wish to delete
- Tap the More (⠇) button.
- Select “Delete Day”
How to rename routes in the hike planner on HiiKER
If you have created multiple routes you can rename them:
- Tap on the “hike days” button
- Highlight the route you want to rename
- Tap the More (⠇) button.
- Select “Rename route”
How to add alternative routes and spurs to a hike on HiiKER
- Create a route in the hike planner
- Tap on the “hike days” button
- Highlight the route you wish to convert to an “Alt” or “Spur” type
- Tap the More (⠇) button.
- Select set route type
- Choose “Alt” or “Spur” as the type, this will recolor the route for anyone viewing the map.
How to create a transport route on HiiKER
- Within the HiiKER planner create a route. Top tip: If you prefer, set the routeing type to “Car” when creating a transport route to follow roads
- Tap on the “hike days” button
- Highlight the route you wish to convert to a transport type
- Tap the More (⠇) button.
- Select set route type
- Choose “Transport”
- Transport layer will be visible for anyone viewing the map, but will not add to the total hike distance. Handy for bus or car journeys to and from trail heads.
How to merge routes on HiiKER
If you have 2 seperate route in the HiiKER hike planner, you can merge them together to be one continous route.
- With your 2 routes in the planner, tap on the “hike days” button
- Ensure the 2 routes you wish to merge are in sequence, one after another.
- Highlight one of the routes
- Tap the More (⠇) button.
- Select “Merge with Previous” or “Merge with next” depending on where you have put the other route.
How to add intermediate points and split a route on HiiKER
Adding intermediate control points helps refine and manage your route path.
To add one, long tap anywhere along the route.
Control Point Options:
- Split Route: Split the route into two at the selected control point.
- Delete Control Point: Remove the selected point.
How to add a hike highlight to my planned hike on HiiKER
- Center the map crosshair on a location that you wish to add a highlight marker,
- Select “more”
- Choose “Add Hike Highlight”
- Add details to your hike highlight
- This will show for all users viewing the end hike map
How to create a looped route on HiiKER
- Create a route.
- Tap “More”
- Select Loop route
- This will automatically loop your route back to the start using the shortest known path.
How to create an “out and back” route on HiiKER
- Create a route.
- Tap “More”
- Select “Out and back”
- This will automatically return your route back to the start along the outbound path.
How to reverse a hike on HiiKER
- Create or edit a route.
- Tap “More”
- Select “Reverse”
- This will switch the start and end points of your hike
How to clear the map and start from scratch
- Tap “More”
- Select “Clear Map”
- This is clear ALL points, routes and days from the map
Saving Your Hike on HiiKER
When your plan is complete, tap the yellow Save button in the top-right corner to save your hike and prepare it for navigation.
Here, you can add details to your new hike:
- Name
- Description
- Planned Date & Time
- Photos
- Difficulty
- Features & Activities (What to expect on the hike)
- Privacy
Make this an official hike: Submit your hike to the HiiKER team for review. Once verified for safety and legitimacy, it will become a public hike — and you’ll be credited as its creator!
Sharing your hike on HiiKER
- Once you have saved your Hike, open the hike overview page from your “My hikes list”
- Tap on the “Share” icon in the top right of the screen.
- From here you can share directly to social media, to WhatsApp, or copy a link to the hike to share as you wish!