

While you can access the HiiKER app on Mac OS laptops and desktops, it’s not optimised or widely monitored and can have issues.
If you want to use HiiKER on a laptop or desktop, you should login to the HiiKER website: https://hiiker.app/
It has all you need to discover routes, plan hikes and review their data on a large screen.
FAQ
HiiKER allows integrations with Garmin and Strava to send your hike data to HiiKER to create reviews for your route, distance and elevation.
If you allowed integration with any of these fitness trackers when you created an account with HiiKER, they will continue to pass data to HiiKER even if you don’t have the HiiKER app.
Remove your Garmin connection
Sign into the HiiKER website, visit hiiker.app/user/profile and switch the connection off.
Alternatively, visit https://connect.garmin.com/modern/settings/accountInformation to stop the connection from the Garmin Connect website.
Remove your Strava connection
Sign into the HiiKER website, visit hiiker.app/user/profile and switch the connection off.
Alternatively, visit https://www.strava.com/settings/apps to stop the connection from the Strava website.
If something interrupts you device during a recording, or you accidentally discard a recording, you may open up the app to see you’re no longer recording.
Accidentally discarded or “vanished” recordings can often be found in: Home tab > My recordings > Options icon in top right > Discarded recordings. Tap to restore the recording. You can also now even “continue” a recording by opening the recording overview page, tapping more, then “continue recording”.
The HiiKER hike planner allows users to plot points on a map and have them create a route to save and hike.
The default behaviour is to use an external service to “snap” to known hiking friendly trails.
There are some hiking trails that are not in the snapping/autorouting meaning your route may not follow the path exactly where your want it to go, rerouting to an alternate path.
The solution to this is to change the “routing” option. It’s a dedicated button in the planner that allows users to change the snapping functionality.
In the case where it’s not autorouting where you want to walk, change routing the “Line” mode, this means they can plot route in straight lines anywhere on the map.
It’s best to plot for a bit in line mode to get through the tricky area, then switch back to hike mode, to see if you can start autorouting again.
Remember: You can also set the routing option to cycle paths or roads in this option for cycling and driving optimised routes.
At HiiKER, we offer estimated hike times for all curated and custom routes to enhance your planning experience.
Our algorithm factors in both distance and elevation gain, comparing them to the specific trail’s details. It then applies your chosen hiking speed, which is set to 5km/h by default.
If you feel these estimates are inaccurate, you can easily adjust your hike time setting. Just go to Profile > Settings > Customise > Hike time setting.
In our calculations, each “day” of hiking represents 5 continuous hours on the trail. So, if a trail is estimated at 1 day and 4 hours, it means we expect it to take about 9 hours of continuous hiking, excluding breaks.
While 5 continuous hours may not align with everyone’s definition of a hiking day, our research indicates it’s the most accurate average for a typical day’s hike.
This is almost always down to the email address you used to purchase the subscription on the website.
Make sure you are logged into the app with the same email address you used to purchase (Check the email address listed by the profile picture on the home page).
You can check for purchase confirmation emails which will be sent to the purchasing email address shortly after signup.
If you are sure you are logged into the same email address, contact us directly through the in app chat, or via email at [email protected]
—-
What is the land access layer?
The land access layer is a map overlay that shows public and protected land across the United States, colour-coded by access type. It helps hikers quickly understand where they can go, what restrictions apply, and whether fees or permits are required before they set out.
Where does this data come from?
The layer is built from the USGS Protected Areas Database of the United States (PAD-US 4.1), the most comprehensive inventory of protected land in the country. We enrich it with data from the National Park Service API, Recreation.gov, the U.S. Forest Service, and the Bureau of Land Management to fill in details like fees, permits, and seasonal opening dates.
How often is the data updated?
We aim to refresh the dataset quarterly. The date shown in the “last updated” field on each area reflects when our pipeline last processed the data. PAD-US itself is typically updated annually by the USGS.
What do the access categories mean?
Open Access — Free, unrestricted public access with no known barriers to entry.
Entry Fee — An entrance or parking fee is required. The fee amount is shown where known.
Permit Required — You need an advance permit, reservation, or booking before visiting. A link to the permit source is provided where available.
Limited Access — Trails or access routes exist, but conditions apply. This may include seasonal restrictions, zonal closures, or managed access programs. Check the area details for specifics.
Restricted — Access is significantly limited. Entry may require special authorisation, guided tours, or be confined to specific areas or times.
Closed — No public access is permitted. This includes military installations, critical habitat preserves, and permanently closed areas.
Unknown — Access status could not be determined from available data. Treat these areas with caution and verify locally before visiting.
Why does an area show a different access type than I expected?
Our access classifications are derived from the GAP Status codes in the PAD-US dataset, supplemented by NPS, USFS, BLM, and Recreation.gov data. There are several reasons a classification might not match your experience on the ground.
Data lag. Access rules change — a park may introduce or drop a fee, a seasonal closure may shift dates, or a new permit system may be introduced. Our data reflects the most recent PAD-US release and API queries, but real-world changes can outpace the update cycle.
Boundary precision. The boundaries shown are derived from federal and state GIS datasets. They are accurate at a planning level but should not be used for precise legal boundary determination. In some cases, boundaries may appear to overlap with private land or neighbouring jurisdictions due to mapping generalisation.
Overlapping designations. A single piece of land can have multiple designations in PAD-US — for example, a national forest may contain a designated wilderness area with stricter access rules. Where designations overlap, we prioritise the more restrictive classification so you’re aware of potential limitations.
Seasonal variation. Some areas are marked as seasonal because their access changes throughout the year (e.g. snow closures, wildlife nesting seasons). The open/close dates shown are approximate and based on the most recently available data. Always confirm current conditions with the managing agency.
Hunting areas. Areas identified as hunting or game lands are flagged with an orange overlay. Hunting seasons, species, and regulations vary by state and zone. This layer does not replace state wildlife agency guidance.
Why are some areas missing?
PAD-US is the most complete dataset available, but it does not cover every piece of accessible land in the country. Private land trusts, informal access agreements, county parks not yet reported to USGS, and tribal lands with public access programs may not appear. We’re working to improve coverage over time.
Can I rely on this for navigation or legal boundary information?
No. This layer is an informational planning tool, not a legal survey. Boundaries are approximate. Always verify access permissions, current conditions, and property boundaries with the local land management agency before your visit. Trespassing on private or restricted land is a legal offence regardless of what any map shows.
I think the data is wrong for a specific area. What should I do?
We appreciate corrections. If you notice an area where the access type, boundary, or details seem incorrect, please contact us at [email protected] with the area name and what you believe is inaccurate. We’ll investigate and update the data in our next refresh cycle.
What does GAP Status mean?
GAP Status is a conservation measure assigned by the USGS that indicates the level of protection a piece of land receives. It ranges from 1 (highest protection, managed for biodiversity) to 4 (no known mandate for protection). We translate GAP Status into our hiker-friendly access categories, but the original GAP code is available in the area detail view for anyone who wants it.
Does this cover land outside the United States?
Not currently. The land access layer covers the 50 US states and the District of Columbia. We’re exploring options for expanding to other countries in the future.
This is almost always down to the “Official hikes” overlay being active.
You can toggle this off by going to any map page, tapping the “Maps” button > tap the “Overlays” tab > Then toggle off the highlighted “Official hikes” option.
There’s a lot of features in HiiKER, so it can be tricky to lear the in’s and out’s, particularly when coming from a different app that you may be used to.
We have a set of quick tutorials for things like planning a hike, searching for a hike, downloading offline maps, using POIs, adding waypoints, etc. They are very short form and can quickly get you up and running with the basics.
https://www.youtube.com/watch?v=fl5OjDuNSJI&list=PLYGwH33I7ExpF3N6o45ZnU-LGd86Bt-Xy
If you are looking for something more long form and comprehensive, we have a collection of live webinars that we have previously recorded. They were recorded by Pete and Paul and got into lots of detail about a number of topics, like “HiiKER Basics”, “Using the HiiKER Website”, “Advance hike planning”, “Maps on HiiKER” and “Advanced features”
https://www.youtube.com/@HiiKER_global/streams
—–
What is 3D Elevation Exaggeration?
3D Elevation Exaggeration is a map setting that controls how dramatically the terrain appears in 3D view. By increasing the exaggeration value, hills and mountains appear taller and more pronounced. Lowering it gives a flatter, more true-to-life representation of the landscape.
What do the values mean?
The slider value represents a multiplier applied to the real-world elevation data:
- 0.1 – Minor exaggeration, may be useful when climbing the highest peaks!
- 1.0 (default) – True-to-life elevation, no exaggeration applied.
- 5.0 – A moderate exaggeration that makes terrain features clearly visible without being unrealistic. Handy for low elevation hills and “peaks”.
- Higher values – Mountains and ridgelines appear much steeper and more dramatic, which can be useful for route planning in hilly terrain.
How do I reset it to the default?
Tap the Reset to default button at the bottom of the screen. This restores the exaggeration value to 1.0.
Does this affect navigation or elevation data?
No. This setting only affects how the 3D terrain is displayed on the map. It does not change any underlying elevation data, route calculations, or ascent/descent figures shown in HiiKER.
Is this available on all map types?
3D Elevation Exaggeration applies to maps that are viewed with 3D mode active.
To find information about your subscription (Renewal, price, etc) follow these steps
Open the HiiKER app. Go to → Home → Settings → App settings → Purchases and subscriptions.
All of your subscription information will be listed there.
They range from the late 1800s to the early 1900s. We can’t give an exact year for a specific area because each map section combines multiple editions, and there are no maps from other eras (such as the 1980s). If your research needs precisely dated old maps, the National Library of Scotland’s collection at https://maps.nls.uk shows dated editions for any location.
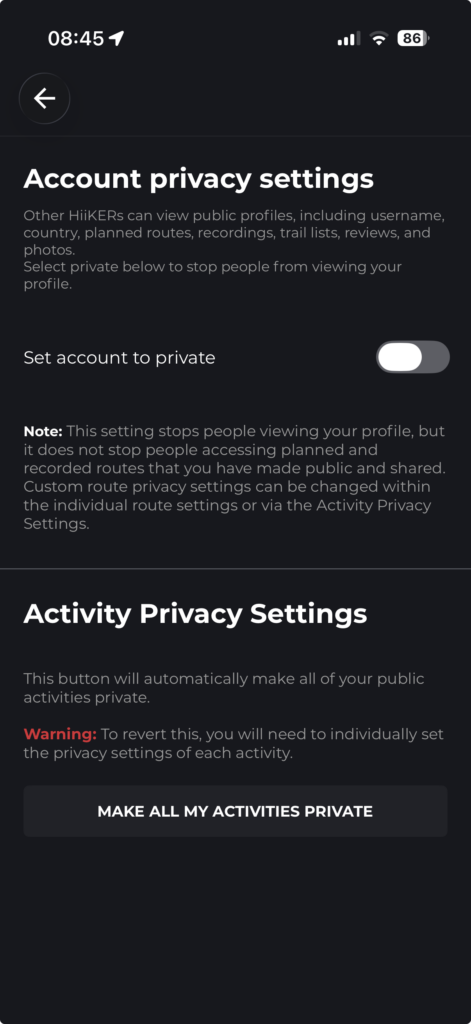
Note: Before proceeding, this is a permanent setting that can only be reverted by changing the privacy status of every individual activity, it can not be reverted!
If you want to force ALL of your activities (Planned routes and recordings) to private, you can do so in one click via the app and webiste.
On the app go to Home > Settings > App Settings > Cutomise > Account Privacy Settings.
On this page tap the “Make all my activities private” button.
On the website, visit https://hiiker.app/user/settings.
At the bottom of the page you will find the option “Make All Recordings and Planned Trails Private”.
Click and confirm to make all activities private.

If you have a lot of offline map bounds on the map or are happy that you have confirm offline maps are downloaded and working correctly, you can hide the orange offline map bounds on HiiKER.
1 — Tap the “Maps” button.
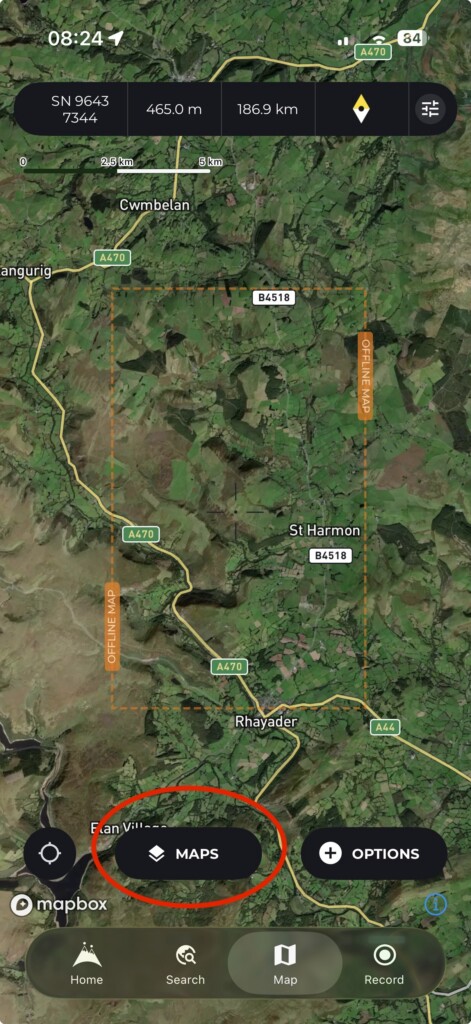
2 — Select “More”.

3 — Choose “Map Settings”.

4 — Toggle on the “Hike offline map bounds” option.

To change your password on HiiKER, select the “Forget Password” option when logging in.
Or visit: https://hiiker.app/password-reset
Both of these option will send you a password reset email with instructions on how to update.
When downloading larger areas of the map, or particularly large trails, there may be a tendency to shut down your HiiKER app.
On Android devices this can interrupt the download from completing.
To combat this, keep your device active in the foreground and the screen awake.
Or, check if you have adjusted your battery optimisations settings for the HiiKER app!
If large area downloads are still proving troublesome, try downloading slightly smaller regions. Remember you can always download multiple regions that you might need!
Apple and Google charge a 30% fee on all in-app purchases, so we offer our best prices on the HiiKER website and pass that saving on to you. Website and in-app PRO+ are exactly the same subscription — buy on the website at https://hiiker.app/pricing, log into the app with the same email, and everything unlocks in the app automatically. If you’re currently renewing in-app at the higher price, you can cancel your in-app subscription and re-subscribe on the website at the lower price when your current period ends.
Often, yes — look for the PRO+ trial on the upgrade screen in the app. During a sale or promotional offer, free trials are paused; the options then are the discounted plan or a monthly subscription if you’d like to try HiiKER before committing to a year.
Nothing — they’re the same thing! HiiKER has just one premium tier, PRO+ (sometimes shortened to Pro). It includes all premium features: OS, Harvey, EastWest and historical map collections, live location sharing, heatmaps, weather maps, and printable maps (https://hiiker.app/print-maps).
If you’ve subscribed but the website still shows you a “buy Pro” prompt (for example when printing a map), your browser session could be out of date — log out of the website and back in and it will recognise your subscription.
If you still can’t access PRO+ features, there may be a deeper issue with your subscription.
Your subscription is tied to the exact account (email address) used at purchase — not to your phone or app store account. In order:
- Check which email you’re logged in with (shown by your profile picture in the app). Signing in with Apple can create a hidden @privaterelay.appleid.com alias, and “Continue without an account” creates an anonymous account not attached to your own personal email.
- Log out (Home > Settings > Log out) and log back in with the exact email you purchased with. You can reset your password at https://hiiker.app/password-reset.
- After a website purchase, logging out and back in — or force-closing and reopening the app — refreshes your subscription.
- Still nothing? Try Profile > Settings > Purchases > Restore purchases.
If none of that works, message us in chat — we can look up which email your purchase is under and transfer a subscription between accounts for you. (A Google Play purchase attaches to whichever HiiKER account was logged into the app at the time — worth checking if someone else’s account was signed in.)
Introductory offers (like the discounted first-year price in our social media campaigns) are for first-time PRO+ subscribers, can be redeemed once per account, and start immediately when you buy — they can’t be queued to start when an existing subscription ends, extended, or applied to a renewal. If you accidentally buy one while already subscribed, message us and we’ll refund the duplicate.
For website purchases, message us in chat and we’ll email you a receipt. Apple and Google send their own receipts by email. To find a Google Play receipt yourself: Play Store app > tap your profile picture (top right) > Payments & subscriptions > Budget & order history > tap the payment > View receipt.
This happens when you’re planning into an area with no mapped route: in Hike mode the planner snaps your new point back to the nearest known path, which can land it almost on top of your previous point. The fix is to switch the Routing option to Line mode for that section (draw straight lines through it), then switch back to Hike mode afterwards.
Route snapping uses an external routing network, and a few trails that are visible on the map aren’t in that network — so the planner routes around them via roads instead. Workaround: tap the Routing button, switch to Line mode to draw straight lines along the missing section, then switch back to Hike mode to continue. If snapping draws straight lines everywhere on the website even in Hike mode, a firewall or ad-blocker (common on work networks) is likely blocking the routing service — try another network or the mobile app.
Add intermediate control points first. Moving a point re-routes everything between the nearest control points, so long-tap (or on the website, click) the red route line to add a control point just before the section you want to change — everything behind it stays anchored.
To move a point, press and hold it, then drag.
All editing works in both the app and the website.
Tutorials: basics https://www.youtube.com/watch?v=w5fnvuOwUB0 and the advanced planning webinar (stages, splitting, merging) https://www.youtube.com/live/GWXqbp6cUls
In the app: For single routes, open the planned hike and tap More > Reverse. On the website: it’s under “Route options” in the right-hand column of the hike planner.
To keep a reversed version of an official hike, save your own copy of it.
One current limit: reversal works properly on single-stage hikes; multi-day hikes don’t reverse their days/stages yet (that’s in development — stages can be adjusted manually in the planner meanwhile).
HiiKER can close a loop, but not invent one: plot your outbound route from start to destination first, then choose More > Loop route and the planner routes you back to the start along the nearest paths. It can’t generate a full loop from a single point or plan a whole route on request — for ready-made options, open the Search tab, tap the location button to see hikes around any place, and filter by difficulty or length.
Estimates are based on distance and elevation using your Hike Time settings, which default to 5 km/h (3.1 mph) walking speed and 600 m of ascent per hour. Change them at Home > Settings > App Settings > Customise > Hike time settings — pick a preset or set a custom pace (you can also reach this from the map options while navigating). The pace setting goes up to 10 km/h; estimates are designed for hiking (there’s no cycling mode) and factor climbs but not steep descents yet.
Yes — while recording and following a hike, tap the small stopwatch icon in the live stats bar to reveal more details, including “Remaining time” to the end of the route. You can also use the Measurement Tool (map Options) — note that when viewing a route it measures along the route (points snap to the track); to measure between any two points, use it from the main map tab.
Swipe down on the small notch/handle at the top of the elevation panel to collapse it, and swipe up to expand it again. (The app currently shows total ascent and the elevation profile; a total descent figure is on the roadmap.)
Tap the yellow stages dropdown panel on the hike map to see all stages and alt routes, then tap any route’s box to focus the map on it — the selected route highlights in yellow. Tap the full hike’s focus icon to get back to showing the full route with alts and spurs
Mark them complete rather than deleting: open the hike and tap the checkmark on its overview page — it moves to your Completed Hikes list and is hidden from Planned Hikes. The “hide completed hikes” toggle at the top of the planned list only hides hikes you’ve marked complete with that checkmark. You can also sort Completed Hikes: open the list and swipe the filter chips across to “Sort”.
Right inside the app: open the map picker (Maps button), then tap the info (i) icon next to any map option (National+, Hiking+, etc.) to see that map’s legend. All legends are also listed at https://support.hiiker.app/article/hiiker-map-legends/.
A couple of symbol tips: on Harvey maps, red dot lines are bridleways (shown as green dashes on OS mapping, which also mark national trails), and mysterious red circles may be the Cell Towers overlay — turn it off under Maps > Overlays.
Map tab > Options > “Go to location”. Make sure the coordinate-system dropdown at the top of that window matches what you’re entering — for latitude/longitude, select the Lat Long option before typing the values. Your current grid reference is always shown in the map information bar (tap the info bar’s settings icon to change coordinate system, crosshair style, and more).
No coordinate juggling needed: open the hike in HiiKER and tap the Directions button — it launches driving directions straight to the trailhead.
Off-route warnings (a PRO+ feature) fire when all of these are true: you started the route with Start Navigation, you’ve moved more than 200 m from the trail (that’s the default — adjust it at Home > Settings > App Settings > Customise > Off route warnings, or from the map options while navigating), and HiiKER has notification permission on your phone. They’re push notifications, so you won’t hear one if your phone is muted. They don’t trigger when walking the route in reverse, and after one fires it won’t repeat until you’re back on the route. Good way to test: plot a short route near home and deliberately walk 200 m+ away from it.
They’re two different things, so there’s no conversion — and no need for one. A recording is the record of a hike you did (and recordings are what count towards your stats). “Completed hikes” is a checklist for ticking off official or planned HiiKER hikes — open a hike and tap the checkmark to mark it done. On the website, you can open a recording and use “Copy to hikes” to create a planned hike from its track if you want to re-walk or share the route.
In the app: open the recording, tap More > “Edit recording details” — this reopens the save flow, so skip to the name step, edit it, then skip to the end and save. On the website: My Recordings > Edit details.
Recordings can’t be edited point-by-point — you can crop the start/end, or copy the recording to a planned hike and fix the track there (though it then no longer counts as a recording). To prevent the jumps in the first place on Android, see the battery optimisation guide: https://support.hiiker.app/article/battery-optimisation-on-android/
The app shows total duration. For exact timestamps, export the recording’s GPX file — every track point in it is timestamped.
Two likely causes: the location marker can be hidden in the map settings (tap the settings icon in the map info bar, scroll down, and toggle the marker back on — it’s easy to switch off by accident, and handy on purpose for practising navigation skills), or you’ve single-tapped the map, which hides the on-screen buttons — tap once more to bring them back.
This means your trails are syncing with HiiKER cloud, meaning that they are being stored to the server enabling cross platform access via the apps and the website. If you are in an area of low network this may take longer than usual.
Imported hikes land in My Planned Hikes; tap the checkmark on each hike to mark it complete. If you’ve imported a big batch, we can save you the tapping: finish your imports, then email [email protected] and we’ll run a process to mark everything in your Planned Hikes as completed in one go.
If both Garmin and Strava are connected, your Garmin activities flow into HiiKER, and HiiKER then forwards them to Strava — on top of Garmin’s own post. Disconnect Strava under profile > Integrations (website) or Home > Settings > Connect with other apps (app) to stop HiiKER posting there. One timing rule worth knowing: recordings only sync to Strava if Strava was connected before the recording was made — a past recording can’t be re-pushed from the app, but message us and we can push it manually.
The HiiKER watch app supports Apple Watch and Wear OS. For any other watch, use GPX: open the hike, tap More > Export GPX, and import the file through your watch’s own app. Routes transfer this way; map tiles can’t be sent to any watch. Galaxy Watch tip: if HiiKER keeps returning to the watch face when you raise your wrist, set watch Settings > Display > “Show last app” to the longest option, and map double-press of the Home key to HiiKER for instant relaunch.
Yes — use the HiiKER website at https://hiiker.app, which has the full feature set (planning is lovely on a big screen) and works with your same login and subscription. We recommend the website over the macOS app, which isn’t as fully featured.
Log out at Home > Settings (gear) > Log out. Reset your password any time at https://hiiker.app/password-reset — and if a reset email link is blocked by your email provider, just type that address straight into your browser instead.
Home > Settings > App Settings > scroll to the bottom > Delete Account. Important: cancel any active subscription first — deleting your account does not stop Apple or Google billing.
Your tour appears in a dedicated “Hillwalk Tours” section on the HiiKER home screen, on the account created for the exact email used to make the booking. If you don’t see it, you’re probably signed into a different or anonymous account: log out (Home > Settings > Log out) and log in with your booking email — reset the password at https://hiiker.app/password-reset if needed. Open the tour’s own map for your daily stages, and switch on points of interest (viewpoints, historic sites) via the Maps button > POIs tab. If the tour attached to your account is wrong or missing, email your booking confirmation to [email protected] and we’ll fix the assignment — then restart the app.
TrailGPT was an AI helper inside HiiKER that answered questions about trails. It was retired around 2024/25 due to low usage, so you won’t find it in the app — some older blog posts still mention it.
To delete multiple recordings on app
- Open “My Recordings”
- Tap the 3 dot icon “⋮”
- From here you can select multiple recordings
- Once you’re happy with your selection, tap “delete”
To delete multiple recordings on web
- Go to https://hiiker.app/user/recordings
- Tap “Delete”
- From here you can select multiple recordings
- Once you’re happy with your selection, tap “delete”
Yes, you can login to 3 devices with your HiiKER account, for example you phone, a tablet and a backup phone.
But this is for personal use only. The same account or HiiKER PRO+ subscription cannot be used by multiple people and is against our terms of service.
By default, National+ switches from the 1:50,000 series to the more detailed 1:25,000 mapping as you zoom in. If you’d rather stay on the familiar 1:50k sheet the whole way in — handy when you’re navigating alongside a paper map, or you just prefer how it reads — you can lock the scale.
A few things worth knowing before you start: the lock only applies to National+ (it’s the only collection with a second scale to switch to), it’s off by default, and it’s remembered per device. Turning it on in the app doesn’t change the website, and vice versa.
In the app (iOS and Android)
- Open any map page and tap the Maps button.
- Tap the info (i) icon next to National+.
- Tap Customise map.
- Turn on Lock to 1-50k scale.
You’ll only find the Customise map option on National+ — it isn’t shown on Hiking+, Historical+ or the other styles. Once the lock is on, a small 1-50k badge appears on the National+ tile in the map picker, so you can tell at a glance that it’s active.
On the HiiKER website
- Open any map at https://hiiker.app and click the Maps button.
- Click More.
- Click Map settings.
- Turn on Lock to 1:50k scale.
Just like the app, the row only appears while National+ is your selected map style, and the National+ card picks up a 1:50k badge while the lock is on. The website stores this in your browser, so you’ll need to set it again if you switch browser or computer. If you ever want to clear it along with your other map settings, there’s a Reset to default button at the bottom of the same Map settings panel.
Switching the lock back off returns National+ to its normal behaviour, with the finer 1:25,000 mapping appearing again as you zoom in.
National+ is part of HiiKER PRO+ — see What’s the difference between Pro and PRO+? for what else is included.
Peak Viewer answers the question “what’s that mountain?”. 3D maps just tilt the terrain. They’re separate features, and it’s easy to mix them up because Peak Viewer uses 3D terrain too.
What Peak Viewer does
It’s a HiiKER PRO+ feature with two views:
- Camera view — hold your phone up to the horizon and every summit in view is labelled with its name and height. Tap a label for the full details on that peak.
- Peaks on 3D terrain — a map view you can tilt around a range to read the summits off the relief, without having to be standing in front of them.
You can move between the two while you’re in it.
How to open it
On any map page, tap Options and choose Peak Viewer. It’s also available as a Quick action (“Open Peak Viewer”).
How it differs from 3D maps
- 3D maps — the 3D Mode toggle in the Maps window tilts the normal map so you can see terrain relief. It never names anything. See How to use 3D maps on HiiKER.
- Peak Viewer — identifies and names the summits around you, through your camera or on the terrain map.
- View in 3D — a free button on a peak’s detail sheet that opens a rotating flyover of that one summit. It doesn’t identify anything; you already know which peak you tapped.
- 3D flyover videos — a different thing again: a rendered video that flies along your route, made on the HiiKER website.
One reason these get confused: the peaks-on-3D-terrain screen inside Peak Viewer uses the same Maps window and the same 3D Mode toggle as the rest of the app. So seeing 3D terrain there doesn’t mean you’re in Peak Viewer — what makes it Peak Viewer is the named summits on top.
Getting the best out of it
- Peaks are found within about 60 km of you. If you see “No named peaks within…”, there’s nothing named in range. On the terrain map, zooming out too far clears the pins for the same reason.
- If the labels don’t line up with the summits, your compass needs help. Move away from metal and vehicles, use Reset to true north, or just drag the screen to nudge the labels into place.
- Use the Range slider to control how far out peaks are shown — handy for cutting clutter on a busy horizon.
- Capture saves and shares a photo of your labelled view.
Do I need PRO+?
Yes. If you’ve seen the “Name every peak you can see” card in the app, its Try it out button gives you one free look — after that, and any time you open Peak Viewer from the map Options menu, it’s a PRO+ feature. The Capture button is PRO+ only, including during the free look.
Terrain data © Mapterhorn.
Some Android devices can be particularly persistent in trying to shut down background tasks to save battery. If you are the type of user to start your recording at a trail head and simple store away your device until it’s done, HiiKER will be trying to run in the background of your device while it’s idle. This means the app is a prime target for the Android OS to target when attempting to optimise battery life.
You can try a few things that will give you the best chance of consistent and sustained recordings on HiiKER.
First of all, make sure you power saver mode is off.
Secondly, you can set the HiiKER app to be “unrestricted” on your device when it comes to battery optimisation settings. Learn about battery optimisation settings here
At HiiKER we’re trying to simplify the discovery of great maps. With this in mid we have begun creating curated map collection from our favourite cartographers around the world.
In the UK, Harvey Maps are the perfect example of that. To find Harvey maps, go to any of our map pages and tap the “maps” button.
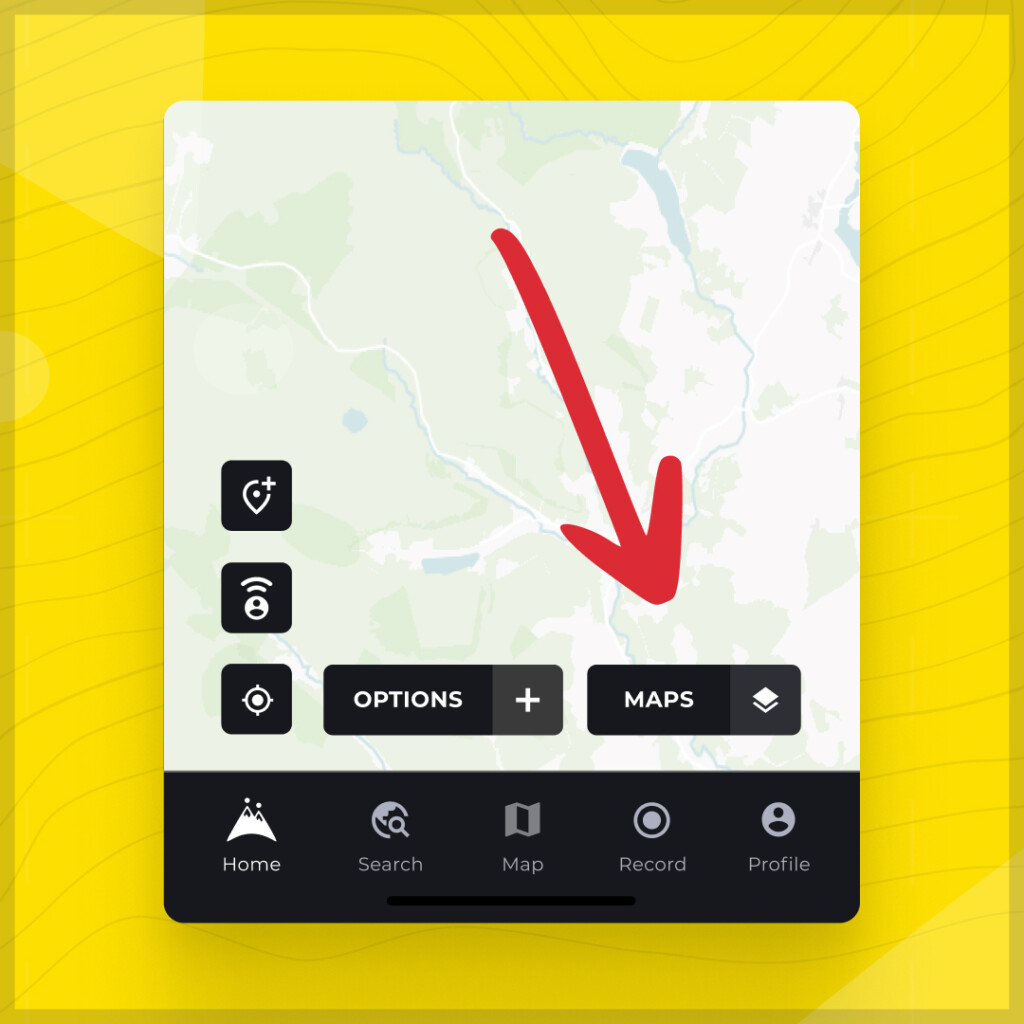
Here you will find our base maps, Standard and Satellite as well as our map collections, Hiking+, National+ and Historical+.
Harvey maps is located in the Hiking+ map collection. Tap the cell to activate it!

Now move the map over to the UK, where you will see our coverage coverage areas. Zoom into these area to reveal the stunning Harvey Maps!
Easy!
At HiiKER we’re trying to simplify the discovery of great maps. With this in mid we have begun creating curated map collection from our favourite cartographers around the world.
In Ireland, Harvey Maps are the perfect example of that. To find Harvey maps, go to any of our map pages and tap the “maps” button.
Here you will find our base maps, Standard and Satellite as well as our map collections, Hiking+, National+ and Historical+.
Harvey maps is located in the Hiking+ map collection. Tap the cell to activate it!
Now move the map over to the Ireland, where you will see our coverage coverage areas. Zoom into these area to reveal the brilliant EastWest Mapping!
Easy!
Yes, since our recent maps update we have removed access to Harvey Maps in Ireland. With our new “Map collections” EastWest Mapping is the prevalent Hiking+ coverage map for Ireland. Harvey Maps are available in the UK in the same collection.
There is currently no option to create an out and back route, you simply need to zoom in close and drop marker along side the outbound trail line rather than on it to avoid intermediate points. A solution is in the works though.
There are a few things that may be prohibiting the update on your device. You can try a couple of things in sequence to try and solve the issue.
- Fully restart your device. Access HiiKER on Play store and try updating again.
- Check for any software updates on your device, before trying the update again.
- Clear the app cache and try updating again.
- Check your internal device storage isn’t full.
- Check network connections.
Failing all of this, your device may not support the minimum Android Operating system needed to run the latest version of the app. You can check this by going to your device settings and checking About phone/device > Android version. If your Android version is 7 or lower and your device cannot update to a higher OS version, you may not be able to use the latest version of the app.