

The photos you take on a hike tell the story of the day: the view from the top, the lunch spot, the muddy bit nobody warned you about. Your 3D flyover now tells it too. As the camera flies your route, it stops where you took your photos, shows them full screen, then flies on to the next one.
In this article: How photo stops work · Which photos get a stop · Add photos the right way · How many photos · Hide photos (PRO+) · Good to know
How photo stops work
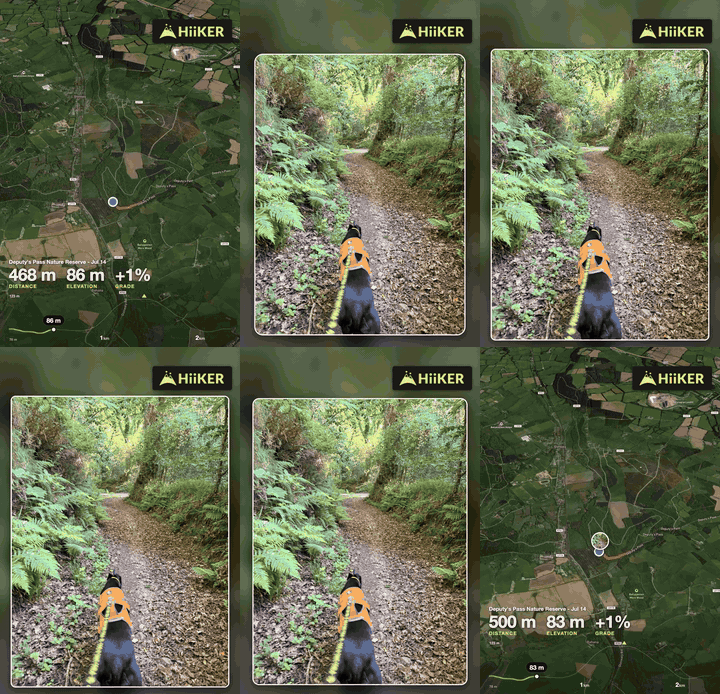
Photo stops appear on the 3D flyover of a recording: in the app, on the website and in the flyover video you share.
- Open a recording that has photos and tap 3D Flyover.
- As the camera reaches a spot where you took a photo, it slows down and lands on it.
- The photo grows out of a round pin on the route to fill the screen, holds for about a second, then shrinks back into its pin and the flight carries on.
Several photos in one place
Photos taken within 150 m of each other, one after another along your route, become a single stop. The flyover lands once and plays them as a slideshow, swiping to the next photo every second, with dots underneath to show how many there are. So twenty photos from the summit make one stop, not twenty.

Once you’ve passed a stop, its pin stays on the route behind you, with the number of photos on it if there’s more than one. Pins for stops you haven’t reached yet aren’t shown, so they don’t spoil the surprise.
On iPhone, tap the photo during a stop to pause the flyover, and tap again to carry on. On Android, the stop plays through and the flyover’s buttons keep working underneath it.
Which photos get a stop
A photo needs to be placed on your route to get a stop. HiiKER places it in one of two ways:
- By where it was taken. If the photo has a location within 400 m of your route, the stop goes there.
- By when it was taken. If it has no location (many phone cameras don’t save one unless you turn it on), HiiKER matches the time the photo was taken to where you were at that moment. Photos taken up to 10 minutes before you started recording or after you finished count too, and go at the start or end of the route.
A photo with neither, or one taken well away from your route and outside the time of your hike, doesn’t get a stop. It still appears in the gallery at the end of the video.
Only photos added to the recording itself count. Photos on waypoints along the way aren’t included.
Add photos the right way
When you add a photo to a recording, the HiiKER app now keeps the time and place it was taken, so the flyover knows where to put it. Add photos when you save your hike, or later from the recording’s menu with Edit Recording Details (Edit recording details on Android).
On iPhone
- Photos from your photo library keep their time and, if they have one, their location.
- Photos taken with the camera inside HiiKER keep the time they were taken, but not a location, so they’re placed by time.
On Android
- The first time you add a photo from your gallery, HiiKER asks for access to your photos. Allow it so HiiKER can read where each photo was taken. Your gallery opens straight after, whatever you choose, and HiiKER won’t ask again.
- If you don’t allow access, your photos are usually placed by time instead.
- Photos taken with your camera keep their time, and their location if your camera saves one.
Photos you added before this update
Until this update, the app didn’t keep a photo’s time or place, so older photos don’t get a stop. They still show in the gallery at the end of the video. To give one a stop, open the recording, choose Edit Recording Details from its menu, remove the photo and add it again from your photo library.
How many photos
- Free: up to 10 photos per flyover.
- PRO+: up to 100 photos per flyover.
The limit follows the plan of whoever recorded the hike, not whoever is watching or making the video. If a recording has more photos than its limit, HiiKER picks photos spread evenly along the route, so every part of the hike gets its moment.
Each photo adds about a second to the flyover video. The video gets longer to fit your photos rather than flying the route faster.
Hide photos from a video (PRO+)
Want just the route? With PRO+, you can leave your photos out of a flyover video when you share it.
In the app (iPhone and Android)
- Open the recording, tap Share and choose 3D Flyover.
- Under Choose format, pick Vertical or Horizontal.
- Under Video options, turn on Hide photos (No photo stops or end-card gallery). On Android, tap Video options first to open it.
- Tap Continue.

On the website, open the recording on hiiker.app, click 3D Flyover and then Share video, and turn on Hide photos under Video options before you click Continue.
Hide photos sits alongside the other PRO+ video options (Hide HiiKER logo, Hide stats panel and Skip intro & outro). Without PRO+, the options are shown locked and tapping one tells you about PRO+. Videos made without PRO+ always include your photos.
Hide photos only changes the video. The 3D flyover you watch in the app or on the website still stops at your photos.
Good to know
- Recordings only. Hike trailers and the 3D flyover of a hike have no photo stops, so the trailer’s video options don’t include Hide photos.
- Videos you’ve already made don’t change. A flyover video made before you added photos (or before this update) keeps the version it was made with. To get a new one with photo stops, delete the old video from My Flyovers, then share the flyover again.
- Others see your photos too. Anyone who watches the flyover of your public recording, or makes a video of it, sees your photo stops. To keep your hike to yourself, make the recording private.
- Works offline. If you’ve downloaded a recording, its photo stops are saved with it. The photos themselves need to have loaded once to show without signal.
- Out-and-back hikes: a photo taken on a stretch you walked twice is shown on the way out.
Quick reference
- Watch it: open a recording with photos > 3D Flyover
- A photo gets a stop when: it was taken within 400 m of your route, or during your hike (up to 10 minutes either side)
- Slideshows: photos within 150 m of each other share one stop
- Limits: 10 photos free, 100 with PRO+, by the recording owner’s plan
- Leave them out of a video (PRO+): Share > 3D Flyover > Video options > Hide photos > Continue
New to flyovers? See How to create a 3D flyover video on HiiKER. To record a hike and add photos, see How to record a hike on HiiKER.
